

Introduction:Hazard Identification and Safety Risk Management Process in Swan Fly Estonia:Hazard Identification:Safety Risk Assessment:Increase of high positive G landings in normal operations:Increase of long flare landings in normal operations:Potential lack of standardisation on how to teach landings:Low amount of landings per month:Negative transfer of skills from previous aircraft types (B737 and B777/B787):Risk MitigationResources:Step 1: Familiarize with Air Belgium Guidelines.ReviewActions:Part 2: Precision Approach Path Indicator: Specific Aspects Related to the B747-8ReviewActions:Part 3: Transitioning from Automatic Flight to Manual FlightReviewActionsPart 4: FlareReviewActions
Introduction:
This risk assessment report focuses on the B747-8 Type Rating Initial Training with Zero Flight Time Training (ZFTT) provided by Swan Fly Estonia. The purpose of this assessment is to address concerns related to hard and long flare landings reported by Air Belgium, the recipient of this training program. The aim is to identify potential hazards, assess associated risks, and implement targeted measures to enhance safety during the training process. This collaborative effort underscores our commitment to promoting aviation safety and proficiency.
Hazard Identification and Safety Risk Management Process in Swan Fly Estonia:
The SFE Risk Assessment process, as detailed in SFE’s Organization Management Manual Chapter 11, encompasses the following stages:
- Hazard Identification: Using reactive, proactive, and predictive methods, hazards that can negatively impact operations are identified, categorized, and documented in a Hazard Register maintained by the Safety Manager.
- Safety Risk Assessment: Hazards are evaluated based on their probability and severity. This process uses a combination of quantitative and statistical analyses, alongside professional judgement, to assign risk levels:
RiskLikelihood | Description |
High (Frequent) | Likely to occur many times. Has already occurred in the SFE ATO operations. |
Medium (Remote) | Unlikely to occur, but possible. Has already occurred in the SFE ATO at least once. |
Low (Improbable) | Very unlikely to occur. Not known to have occurred in the SFE ATO operations, but has already occurred at least once in the aviation industry. |
RiskSeverity | Description |
High | A large reduction in safety margins, physical distress or a workload. Serious incident/Injure to persons/ETA – Level 1/Severe financial loss/ Considerable negative impact on reputation |
Medium | A significant reduction in safety margins, a reduction in the ability of the personnel to cope with adverse operating conditions as a result of conditions impairing their efficiency. Incident/ ETA – Level2/ Some financial loss/ Limited impact on reputation |
Low | Not Safety related event. No financial loss/ No impact on reputation |
- Risk Mitigation: To minimize or eliminate the identified risks, mitigation strategies are developed and implemented. These strategies are continually monitored for their effectiveness and potential for improvement.
Hazard Identification:
In dialogue with Air Belgium, the subsequent potential hazards were identified:
- Increase in high positive G landings during normal operations: This suggests a potential issue with landing techniques, which can affect aircraft longevity.
- Increase in long flare landings in normal operations: Like the first point, this also indicates a potential problem with landing techniques, potentially leading to runway overruns.
- Potential lack of standardization in teaching landings: This could lead to inconsistent practices among pilots, impacting the safety and efficiency of operations.
- Low frequency of landings per month: This could limit pilots' opportunities to maintain and improve their landing skills.
- Negative transfer of skills from previous aircraft types (B737 and B777/B787): This suggests that pilots transitioning from other aircraft types may face challenges in adapting their skills to the current aircraft, which could impact flight safety.
Safety Risk Assessment:
Building on our identified hazards and referencing the stipulated method of risk assessment in AMC1 ORA.GEN.200(a)(3), we've conducted a detailed Safety Assessment for each hazard, balancing quantitative data, statistical analysis, and professional judgment.
Increase of high positive G landings in normal operations:
This hazard presents a potential High Severity due to the substantial reduction in safety margins, physical distress, and workload, which can lead to serious incidents. The frequency, considering the current operations, can be classified as Medium. According to the matrix, this places the risk at R2 - requiring immediate actions for risk level reduction.
Increase of long flare landings in normal operations:
With potential for significant reduction in safety margins and increased workload for personnel, the severity is assessed as Medium. Frequency, currently, can also be considered as Medium. This risk level is R3, indicating the need for corrective and preventive actions and the Hazard/Undesirable Event register update.
Potential lack of standardisation on how to teach landings:
This could significantly reduce the personnel's ability to cope with adverse operating conditions, hence Medium Severity. As it has already occurred at least once in the SFE ATO, the likelihood is Medium. Hence, this risk level falls under R3.
Low amount of landings per month:
It was concluded that conducting a risk analysis for this particular situation falls under the jurisdiction and responsibility of the operator. Hence, we will not be proceeding with this task.
Negative transfer of skills from previous aircraft types (B737 and B777/B787):
This could lead to a significant reduction in safety margins, thus, its severity is Medium. Given the diverse fleet and experience levels of our pilots, the likelihood can be considered as Medium, leading to a risk level of R3.
Following this assessment, and in line with the guidance from AMC1 ORA.GEN.200(a)(3), we will work on defining suitable corrective and/or preventive actions for each identified risk. Once countermeasures are established, they will be implemented and their effectiveness verified by the relevant departments, ensuring that our operations continue to uphold the highest standards of safety.
Risk Mitigation
This Risk Mitigation plan is designed around the actionable items identified for the Approved Training Organisation (ATO). These "ATO Actional Items" refer to the tasks, procedures, and responsibilities within the ATO's control, particularly those related to training methodologies, and strategies to enhance flight safety. It's important to note that this plan does not include recommendations for the Operator. If needed, a separate Risk Assessment should be performed independently by the Operator. This clear distinction is to ensure a focused approach to addressing and mitigating risks identified during the training process in the ATO environment.
Resources:
To elaborate on the Risk Mitigation, the following resources have been used:
- Boeing B747 Flight Crew Training Manual - Revision 12, Chapter 6.
- Boeing 747-8 QRH - Revision 23. Refer to Performance Inflight, 747-8 GENX-2B67 C KG M EASA.
- Other resources: CS ADR-DSN.M.645, ICAO Doc 9157, Landing the B747 - Air Belgium Guidelines.
Readers should bear in mind that new revisions may have been issued and should always refer to the latest versions.
Adverse weather conditions, other than crosswind/gusting conditions, are not considered factors affecting Flaring technique (from Manual Flying transition until touchdown). Therefore, students/instructors should refer to the relevant sections for that.
Please note that non-normals, such as flight control malfunctions or overweight conditions, have not been considered in this document.
Remember: A smooth touchdown is not the criterion for a safe landing!
Step 1: Familiarize with Air Belgium Guidelines.
Review
The following presentation has been developed by Air Belgium and covers the key aspects of the Flight Crew Training Manual (FCTM). Instructors and students should be fully familiar with its content. The instructor should present this material before conducting FFS Session 01 and answer/ask questions as needed.
Actions:
Part 2: Precision Approach Path Indicator: Specific Aspects Related to the B747-8
Review
The positioning of the PAPI system relative to the runway threshold is calculated to ensure optimal compatibility between visual and non-visual aids for a variety of aircraft, considering the range of eye-to-antenna heights. This becomes particularly pertinent in the case of the B747. Due to the increased distance between the ILS antenna and the pilot's eye level, PAPI indications may become unreliable when crossing the threshold, necessitating pilots to be cautious.
Example 1: A snapshot taken at 50 RA (Radio Altimeter) demonstrates that the aircraft is correctly established on the ILS. However, from the perspective of "Eye-to-Antenna" height, the PAPI system displays three white lights and one red light. This indicates that the aircraft is perceived to be slightly above the ideal glide path, despite being accurately aligned according to the ILS.
Actions:
Understand PAPI System: Familiarize with the Precision Approach Path Indicator (PAPI) system. It's a lighting system installed typically on the left side of the runway to assist pilots in maintaining the correct glide path for landing.
Recognize PAPI Signals: On a normal 3° glide path, you should see two white lights on the left and two red lights on the right.
Consider PAPI Positioning: Understand that the PAPI system is usually set to intersect the runway between 1,000 and 1,500 feet beyond the threshold.
PAPI with B747: Acknowledge that for a B747, due to the increased distance between the ILS antenna and the pilot's eye level, PAPI indications may become unreliable, passing the Runway Threshold.
Use PAPI with Caution: Use caution when relying on PAPI before the threshold crossing, especially in aircraft like the B747.
Check Alignment with ILS: Always cross-check the PAPI system with the Instrument Landing System (ILS) to ensure accurate alignment. Even if PAPI shows you're slightly above the glide path, you may be correctly aligned according to the ILS.
Use Radio Altimeter: Use the Radio Altimeter (RA) to confirm your altitude and alignment. For instance, at 50 RA, despite PAPI showing three white lights and one red light, you may still be correctly established on the ILS.
Part 3: Transitioning from Automatic Flight to Manual Flight
Review
FCTM:
Whereas the FCTM recommends disengaging the autopilot/autothrottle approximately between 300 to 600 feed AGL, it also states:
Appendix A.2.3:
Manual flight is encouraged to maintain pilot proficiency, but only when conditions and workload for both the pilot flying and pilot monitoring are such that safe operations are maintained. Many operators have developed an automation use policy that gives pilots the opportunity to maintain proficiency in manual flight.
It's been observed that students often revert to old habits and pitch/N1 settings from aircraft they've previously flown. This is a recurrent issue that needs addressing.
QRH:
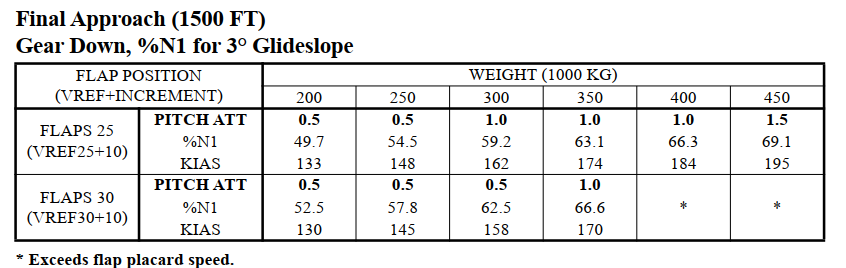
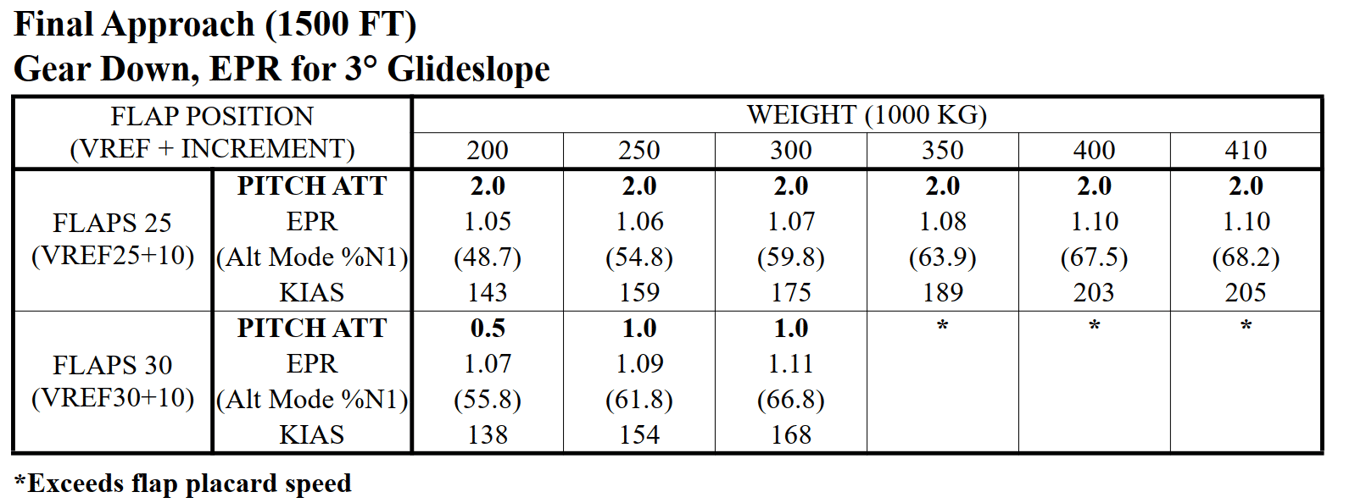
The QRH provides useful guidance for power/pitch settings. Students should keep these settings in mind:
747-8 GENX-2B67
747-400 RB211-524G
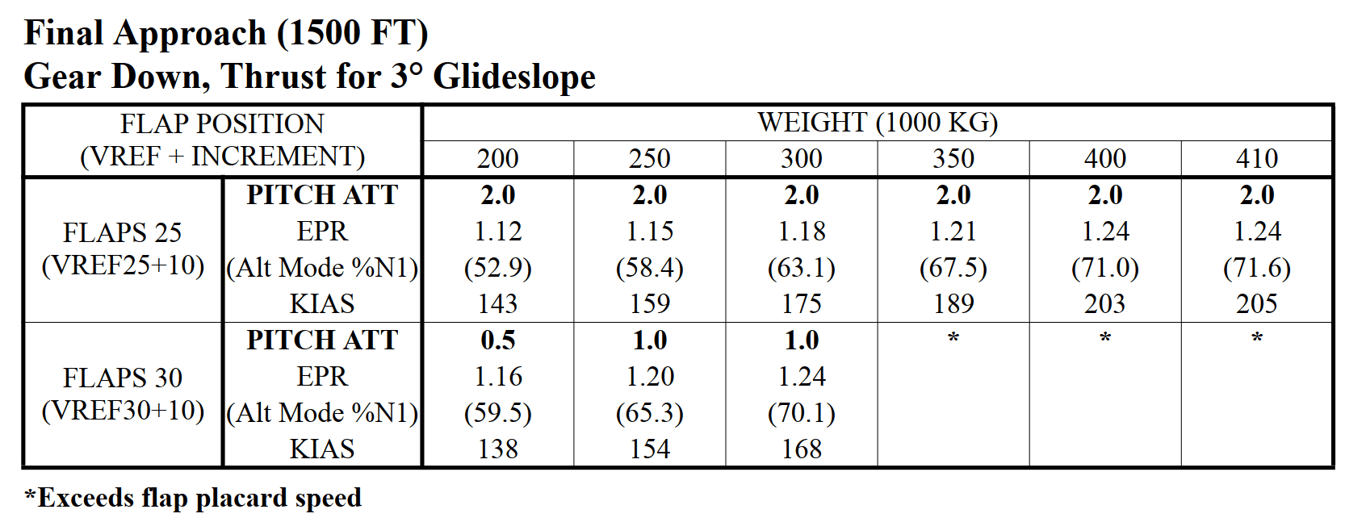
747-400F CF6-80C2B1FS
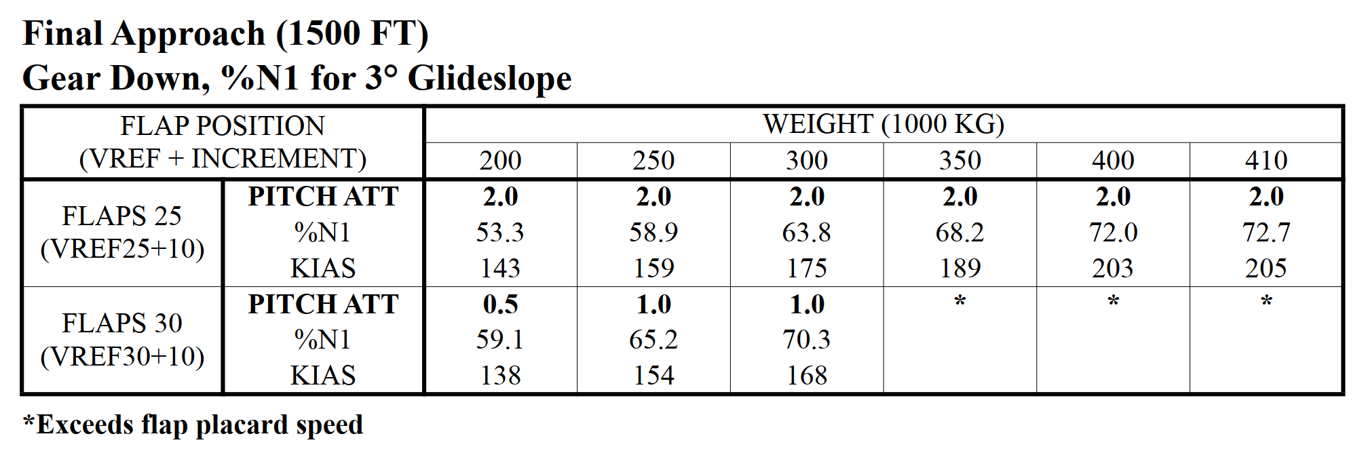
747-400 PW4056
FCOM:
Understanding the FPV:
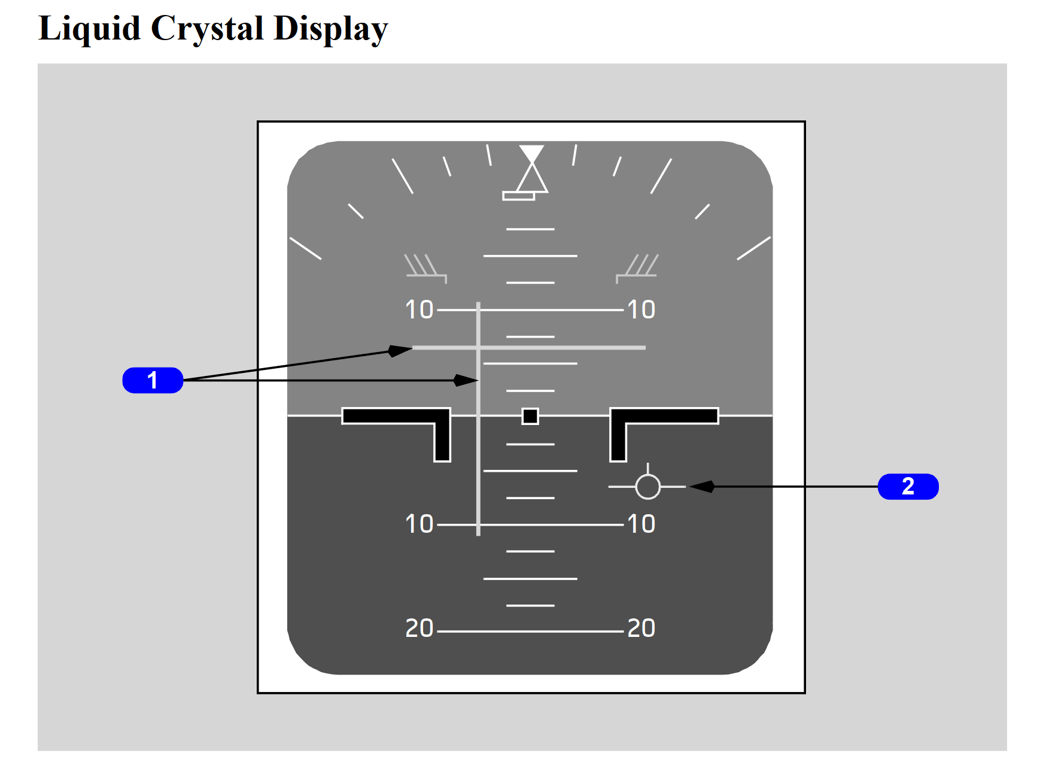
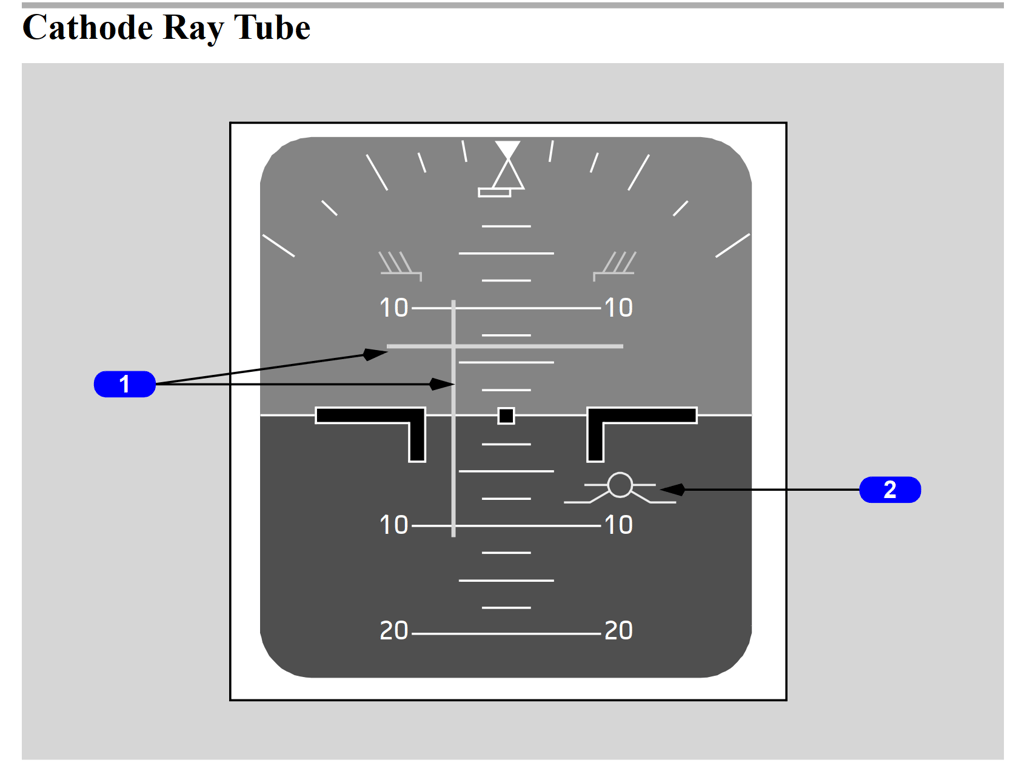
Displays flight path angle and drift angle when selected on EFIS control panel.
Flight path angle displays relative to the horizon line.
Drift angle is represented by the perpendicular distance from the centerline of the pitch scale to the FPV symbol.
Flight path angle displays relative to the horizon line.
Drift angle is represented by the perpendicular distance from the centerline of the pitch scale to the FPV symbol.
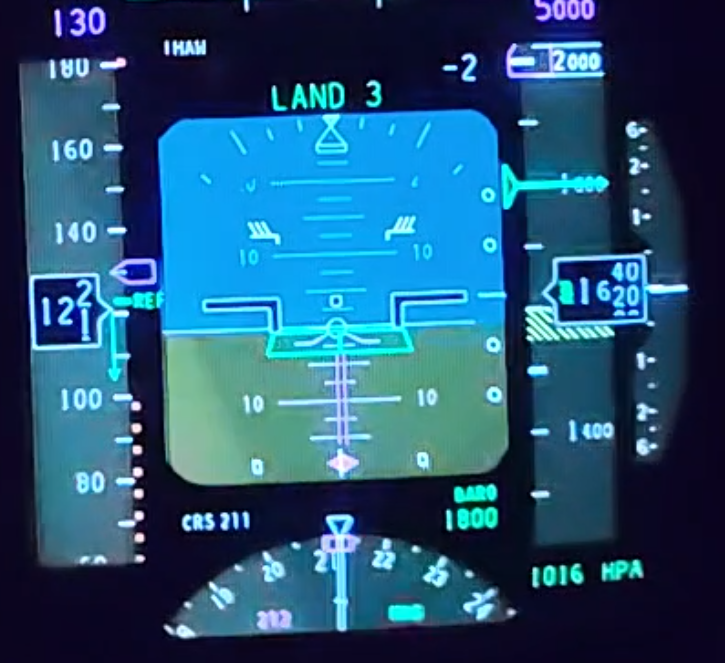
The FPV offers valuable insights into the Flight Path angle, particularly when flying without FD guidance. As illustrated in the accompanying image, the aircraft is precisely aligned with a 3-degree path when the FPV "arms" align with the -5-degree pitch indicator. For LCD displays, which don't show the "arms", the center of the FPV circle should sit 0.5 degrees beneath the -2.5-degree pitch mark:
Actions
It is important to remind students to always follow the operator’s SOPs and its Automation philosophy.
Regardless of the height at which the Autopilot is disconnected, the following recommendations must be followed during training:
Make sure the pilot is familiar with the power and attitude settings for various flap and mass configurations.
Ensure the aircraft is stable, in trim, and at correct power (N1) before switching from autopilot to manual. Avoid sudden changes to prevent issues. This is particularly important in gusty conditions: the N1/Pitch may be far from the “average” setting before disconnecting.
Stress the need for gentle controls after autopilot disengagement. Overcorrection must be avoided.
When disconnecting the Autopilot at low heights with more than one autopilot engaged, the autopilot system controls the rudder. It is important to ensure that the pilot is aware of this and avoids sudden changes in rudder inputs.
Students should safely practice manual flying under varied conditions during the training to boost their adaptability and confidence.
Highlight the importance of the Flight Path Vector (FPV) as a key tool in understanding the Flight Path angle, especially when Flight Director (FD) guidance isn't in use.
Demonstrate how an aircraft is properly aligned with a 3-degree path: This is achieved when the FPV "arms" are in line with the -5-degree pitch indicator (CRT) or the center of the FPV circle's is 0.5 degrees below the -2.5-degree pitch mark (LCD).
Part 4: Flare
Review
FCTM:
Initiate the flare when the main gear is approximately 30 feet above the runway by increasing pitch attitude approximately 2° - 3°. This slows the rate of descent.
After the flare is initiated, smoothly retard the thrust levers to idle, and make small pitch attitude adjustments to maintain the desired descent rate to the runway. A smooth thrust reduction to idle also assists in controlling the natural nose-down pitch change associated with thrust reduction. Hold sufficient back pressure on the control column to keep the pitch attitude constant. A touchdown is normal with an airspeed of approximately VREF. Ideally, main gear touchdown should occur simultaneously with thrust levers
reaching idle.
reaching idle.
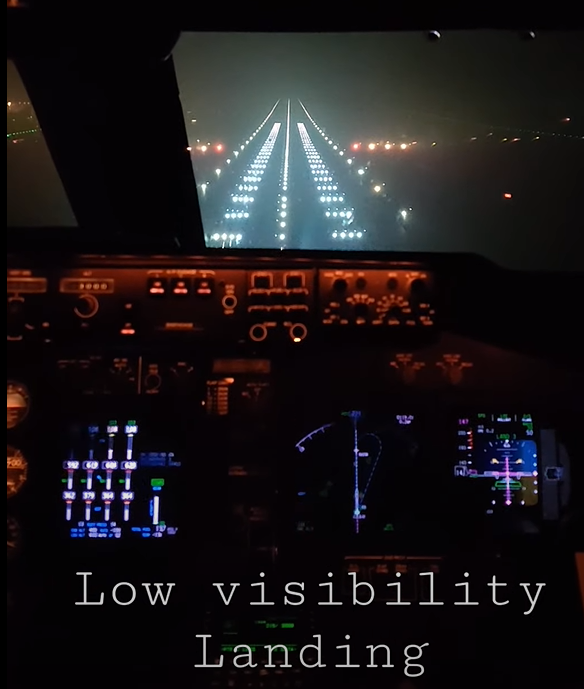
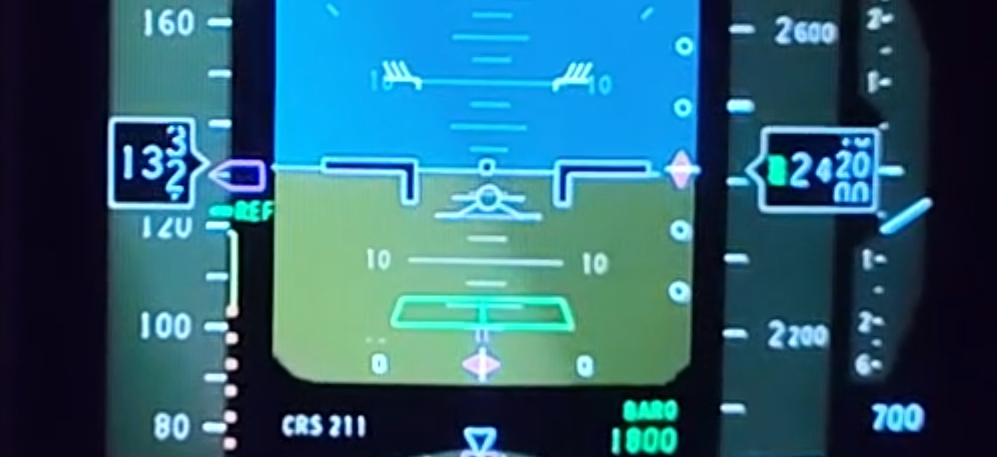
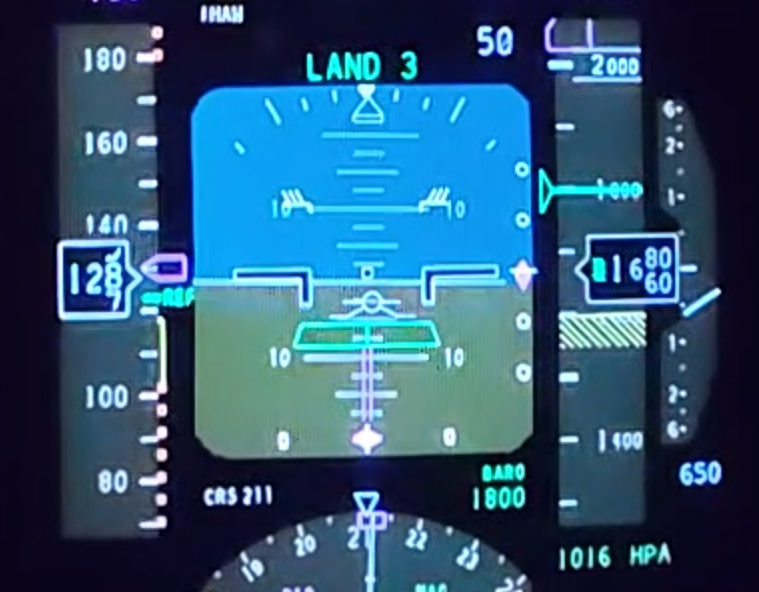
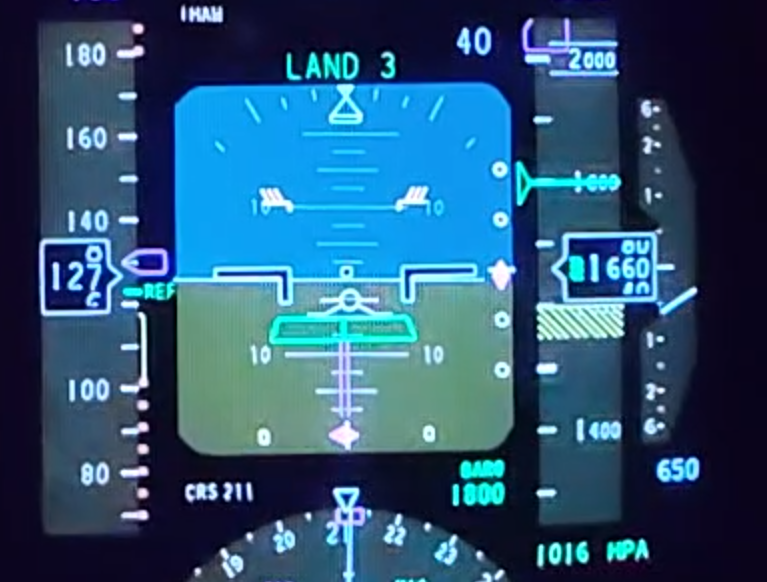
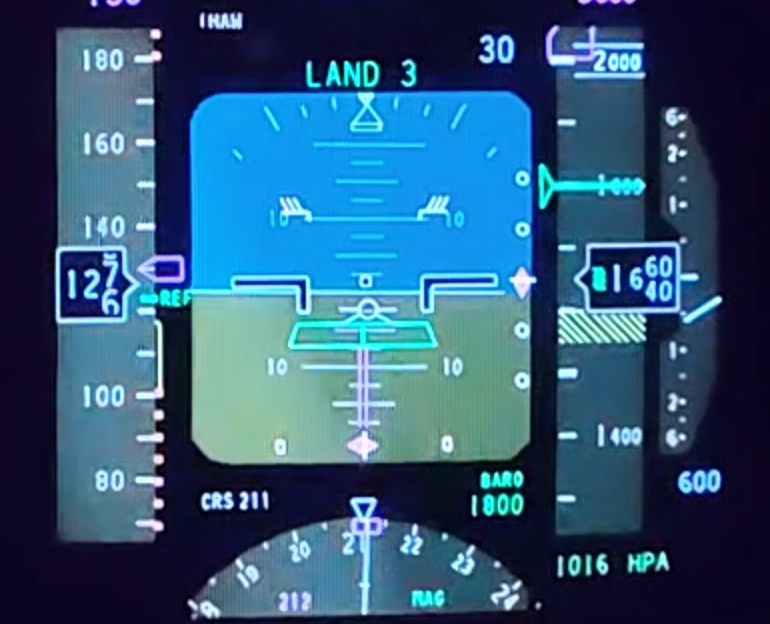
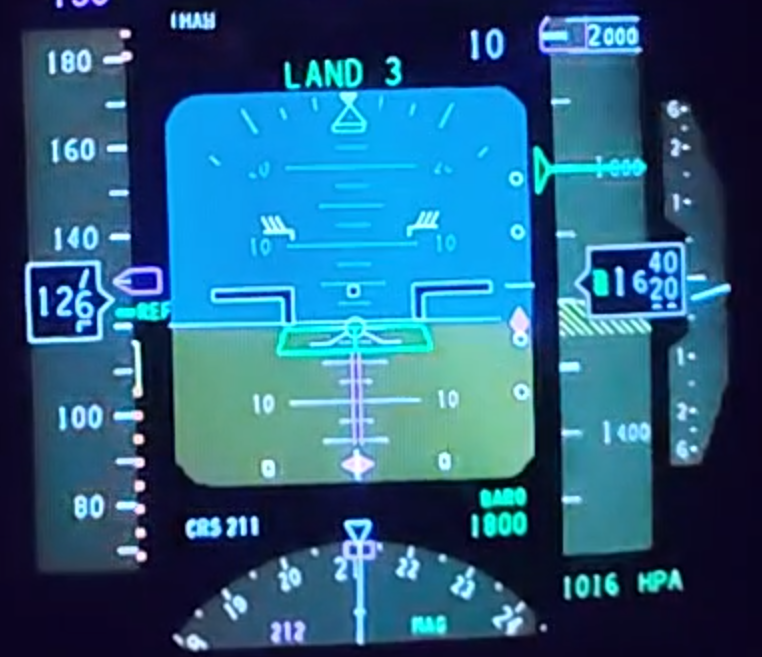
The following video sequence of images are taken during an actual Autoland:

Actions
At 50’ RA: below this height, it is too late to regain the glide path. Pitching up/down from the target pitch to regain slope may lead to a hard/long landing. Go around should be considered.
At 30’ RA : Increase pitch attitude 2° - 3° and retard thrust to idle smoothly.
Monitor descent rate.
Smoothly retard thrust levers to idle.
Be aware of nose-down pitch with thrust reduction.
Maintain consistent pitch attitude.
Apply adequate back pressure on control column.
Ensure touchdown near VREF airspeed.
Main gear touches down as thrust levers reach idle.
 Made with Bullet